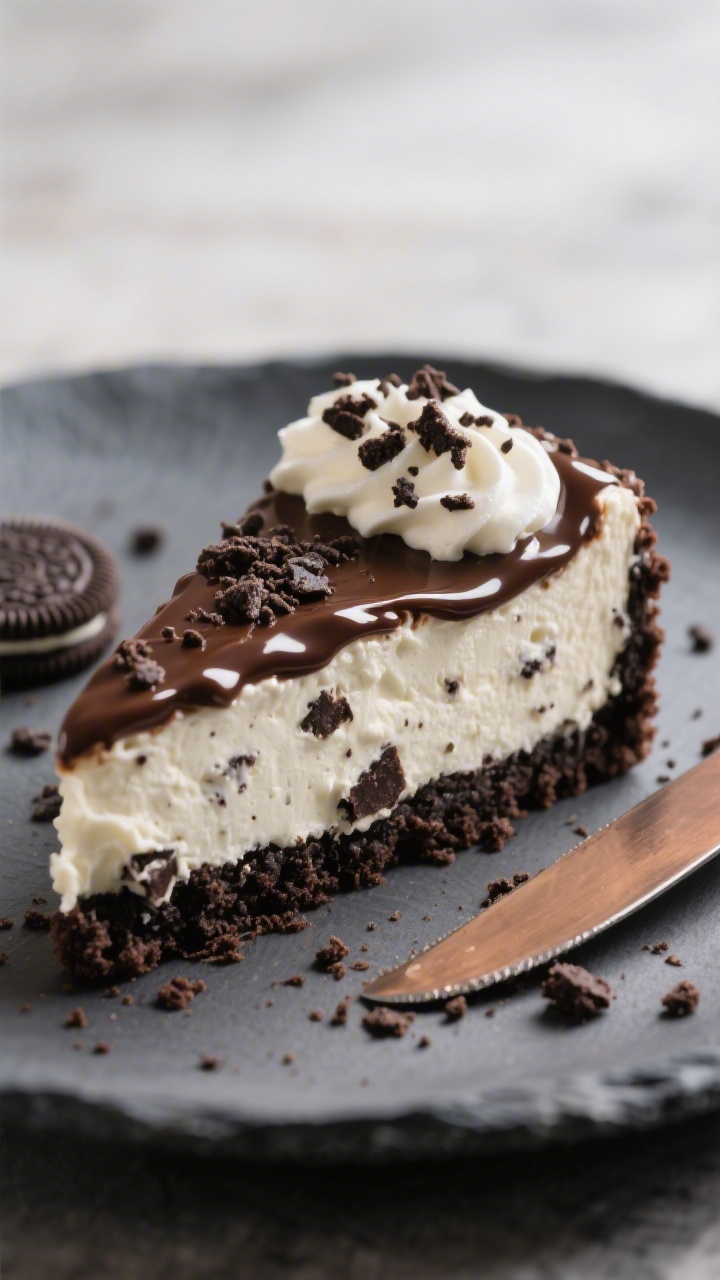
Oreo Dessert Recipe – A Creamy, No-Bake Crowd-Pleaser
If you’re craving something creamy, crunchy, and irresistibly chocolatey, this Oreo dessert recipe hits the spot. It’s a no-bake treat with layers of crushed cookies, silky cream cheese filling, and fluffy whipped topping. You don’t need fancy tools or baking skills—just a little mixing and layering.
It’s perfect for birthdays, potlucks, or a weeknight sweet tooth. Best of all, it comes together fast and chills into a sliceable, decadent dessert that feels special without the fuss.
What Makes This Special
This recipe celebrates the classic Oreo in the best way: plenty of cookie crumbs, a rich and tangy cream cheese layer, and a light, cloud-like finish. It’s forgiving and flexible, so you can adjust sweetness, swap toppings, or add flavors without worry.
Because it’s no-bake, there’s no guessing about doneness or managing oven times. It also scales easily for a crowd and looks great layered in a pan or individual cups.
Shopping List
- Oreos: 36 standard cookies (about 3 cups crushed), plus extra for topping
- Unsalted butter: 6 tablespoons, melted
- Cream cheese: 16 ounces (two 8-oz blocks), softened to room temperature
- Granulated sugar: 1/2 cup
- Vanilla extract: 2 teaspoons
- Cold heavy whipping cream: 2 cups (or 16 oz tub whipped topping if you prefer)
- Powdered sugar: 1/3 cup (for stabilizing the whipped cream)
- Milk: 2–3 tablespoons, as needed for cream cheese smoothness
- Salt: A small pinch (optional, to balance sweetness)
- Chocolate sauce or hot fudge: Optional drizzle
Instructions
- Make the crust: Add 24 Oreos to a food processor and pulse to fine crumbs. Stir in melted butter until the mixture resembles damp sand.Press firmly into the bottom of a 9×9-inch pan or a 9-inch springform. Use the bottom of a glass to compact. Chill while you prep the filling.
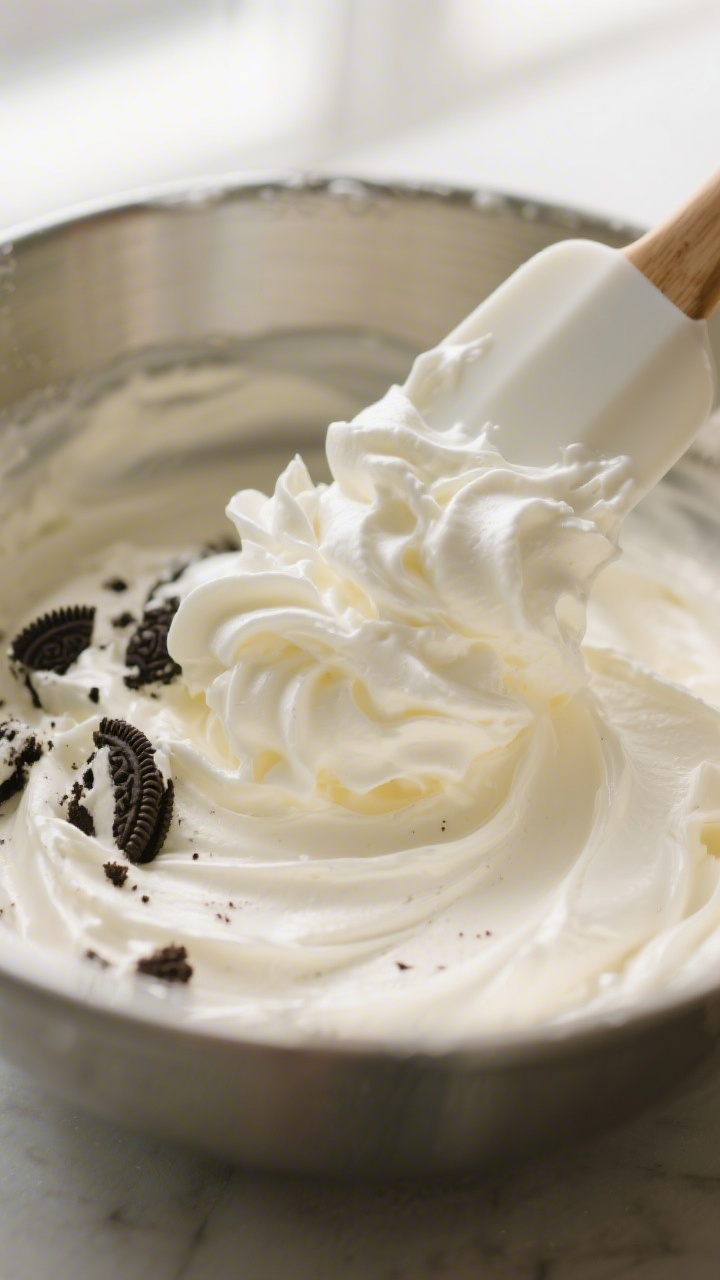
- Whip the cream: In a cold bowl, beat heavy cream and powdered sugar on medium-high until soft to medium peaks form.Don’t overbeat. Set aside in the fridge. If using whipped topping, skip this step.
- Beat the cream cheese: In a separate bowl, beat softened cream cheese, granulated sugar, vanilla, and a pinch of salt until very smooth and fluffy, about 2–3 minutes.If it looks stiff, beat in 2–3 tablespoons of milk, 1 tablespoon at a time, until it’s creamy and spreadable.
- Fold in whipped cream: Gently fold half the whipped cream into the cream cheese until mostly combined. Fold in the rest just until smooth. Keep it airy; don’t stir aggressively.
- Add cookie chunks: Crush 8–10 more Oreos into small chunks (not dust) and fold them into the filling.This adds crunch and more Oreo flavor.
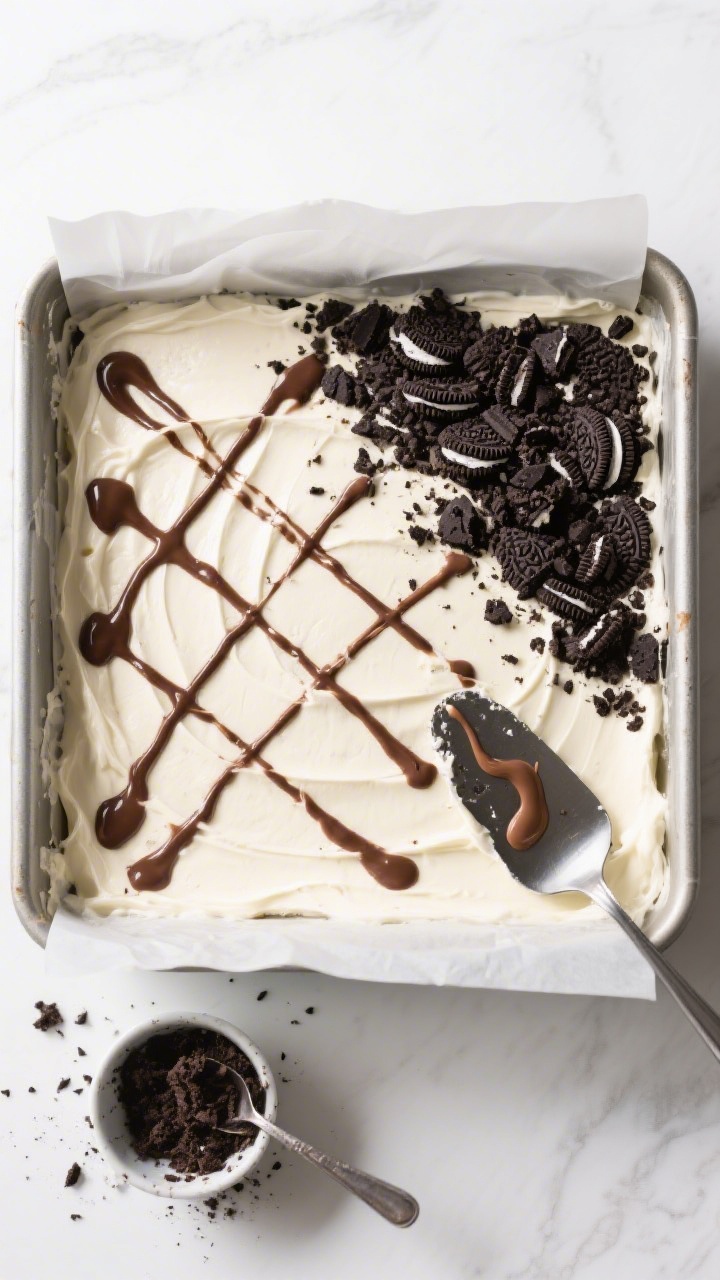
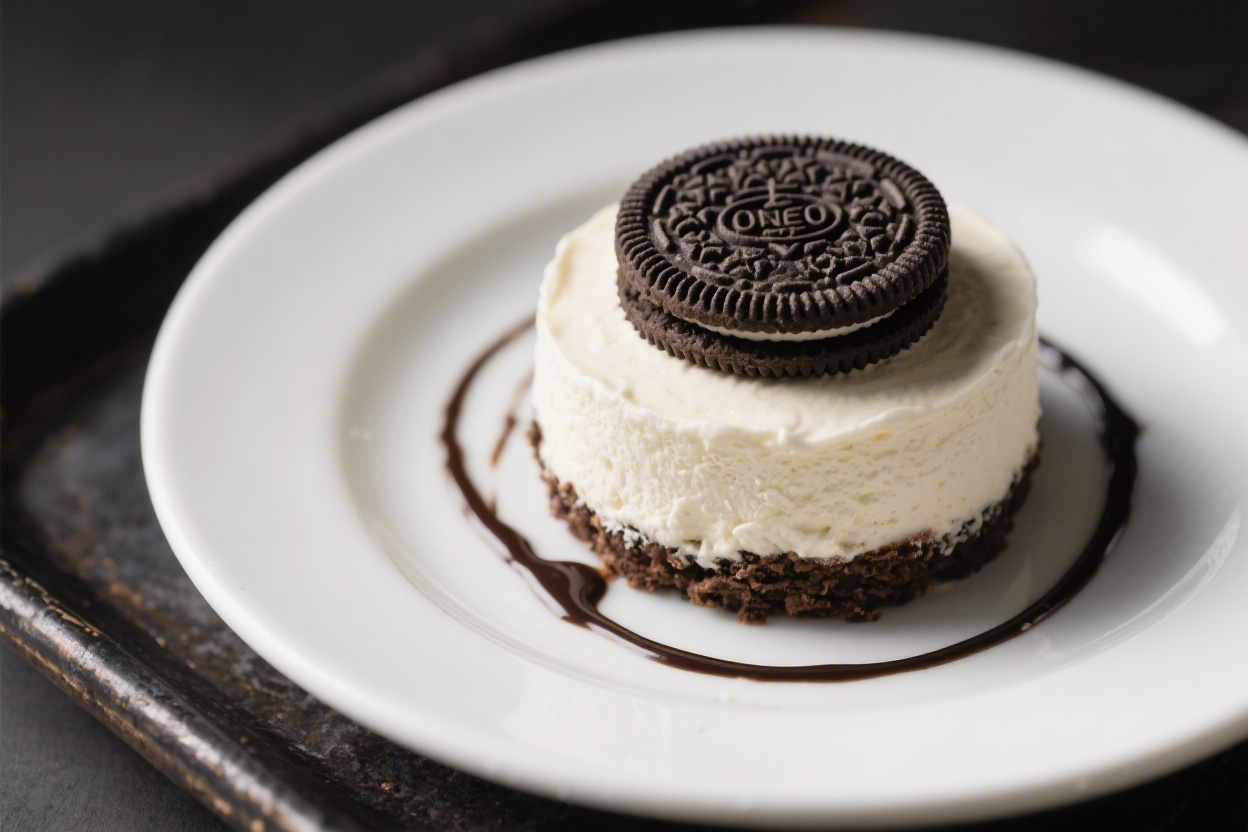
- Assemble: Spread the filling over the chilled crust. Smooth the top with an offset spatula. If you have extra whipped cream, add a thin top layer for a bakery look.
- Chill: Cover and refrigerate for at least 4 hours, preferably overnight.This helps the layers set and makes clean slices.
- Finish and serve: Right before serving, drizzle with chocolate sauce and sprinkle with more crushed Oreos. Cut with a warm, dry knife for neat edges.
How to Store
Keep the dessert covered in the fridge for up to 4 days. The crust stays best in the first 48 hours, but the flavor actually deepens by day two.
For longer storage, freeze tightly wrapped for up to 1 month. Thaw in the fridge overnight before serving. If you plan to freeze, skip the chocolate drizzle and add it fresh after thawing.
Benefits of This Recipe
- No-bake: No oven, no hassle.Great for hot days or busy schedules.
- Beginner-friendly: Simple steps and familiar ingredients make it hard to mess up.
- Make-ahead: Chills beautifully, so you can prepare it the night before.
- Customizable: Swap flavors, add layers, or make it gluten-free with certified GF sandwich cookies.
- Crowd-pleasing: Classic Oreo flavor with a creamy, not-too-sweet finish.
Common Mistakes to Avoid
- Forgetting to soften the cream cheese: Cold cream cheese turns lumpy. Let it sit out 30–60 minutes before mixing.
- Overmixing whipped cream: Beat to soft/medium peaks; grainy or stiff cream can break in the filling.
- Crust too loose: Press it down firmly and use enough butter. If crumbs fall apart, add another tablespoon of melted butter and repack.
- Skipping chill time: The dessert won’t slice cleanly and can feel runny.Give it at least 4 hours in the fridge.
- Adding toppings too early: Drizzles and extra crumbs can get soggy. Add right before serving for the best texture.
Alternatives
- Peanut butter swirl: Warm 1/3 cup peanut butter and swirl over the top before chilling. Add chopped peanuts for crunch.
- Mint-chocolate: Add 1/2 teaspoon peppermint extract to the filling and use mint Oreos.A sprinkle of crushed peppermint candies is great for holidays.
- Mocha version: Dissolve 1 teaspoon instant espresso in 1 tablespoon hot water and beat into the cream cheese layer.
- Berry layer: Add a thin layer of crushed raspberries or a quick raspberry jam between crust and filling. Tart fruit cuts the richness.
- Individual cups: Layer crumbs, filling, and toppings in small jars or cups for parties. No slicing needed.
- Lighter option: Use reduced-fat cream cheese and light whipped topping.Flavor stays, texture is slightly softer.
FAQ
Can I use store-bought whipped topping instead of heavy cream?
Yes. Use 16 ounces of whipped topping and fold it into the cream cheese mixture just like the whipped cream. The texture will be a bit lighter and sweeter, but it works well and saves time.
How do I make this gluten-free?
Use certified gluten-free chocolate sandwich cookies and double-check that your other ingredients are GF.
The method stays the same, and the results are very similar.
What if I don’t have a food processor?
Put Oreos in a sturdy zip-top bag and crush with a rolling pin or heavy pan. Aim for a mix of fine crumbs for the crust and bigger bits for folding into the filling.
Can I reduce the sugar?
Absolutely. Cut the granulated sugar in the filling to 1/3 cup.
The Oreos and whipped cream add natural sweetness, so it will still taste balanced.
How long should it chill?
At least 4 hours, but overnight is best. A longer chill gives a cleaner slice and a more cohesive texture.
Why is my filling runny?
Common causes are under-whipped cream, cream cheese that wasn’t fully softened and beaten smooth, or skipping chill time. Next time, whip to soft/medium peaks, beat the cream cheese until fluffy, and let it rest in the fridge long enough to set.
Can I make this ahead for a party?
Yes.
Make it 1–2 days ahead and keep it covered in the fridge. Add toppings right before serving to keep them crisp and pretty.
What pan size works best?
A 9×9-inch square pan is ideal for thicker layers. A 9×13-inch pan yields thinner layers and more servings.
A 9-inch springform gives a nice round presentation with clean edges.
Wrapping Up
This Oreo dessert recipe is the kind of treat you’ll make once and memorize. It’s simple, reliable, and endlessly adaptable, with a creamy filling and that signature Oreo crunch. Whether you’re feeding a crowd or just treating yourself, it delivers comfort and a little wow factor without taking over your kitchen.
Keep a pack of Oreos on hand, and you’re halfway to dessert.
Oreo Dessert Recipe - A Creamy, No-Bake Crowd-Pleaser
Ingredients
Method
- Make the crust: Add 24 Oreos to a food processor and pulse to fine crumbs. Stir in melted butter until the mixture resembles damp sand.Press firmly into the bottom of a 9x9-inch pan or a 9-inch springform. Use the bottom of a glass to compact. Chill while you prep the filling.
- Whip the cream: In a cold bowl, beat heavy cream and powdered sugar on medium-high until soft to medium peaks form.Don’t overbeat. Set aside in the fridge. If using whipped topping, skip this step.
- Beat the cream cheese: In a separate bowl, beat softened cream cheese, granulated sugar, vanilla, and a pinch of salt until very smooth and fluffy, about 2–3 minutes.If it looks stiff, beat in 2–3 tablespoons of milk, 1 tablespoon at a time, until it’s creamy and spreadable.
- Fold in whipped cream: Gently fold half the whipped cream into the cream cheese until mostly combined. Fold in the rest just until smooth. Keep it airy; don’t stir aggressively.
- Add cookie chunks: Crush 8–10 more Oreos into small chunks (not dust) and fold them into the filling.This adds crunch and more Oreo flavor.
- Assemble: Spread the filling over the chilled crust. Smooth the top with an offset spatula. If you have extra whipped cream, add a thin top layer for a bakery look.
- Chill: Cover and refrigerate for at least 4 hours, preferably overnight.This helps the layers set and makes clean slices.
- Finish and serve: Right before serving, drizzle with chocolate sauce and sprinkle with more crushed Oreos. Cut with a warm, dry knife for neat edges.
Printable Recipe Card
Want just the essential recipe details without scrolling through the article? Get our printable recipe card with just the ingredients and instructions.